Shower Panel Guide | Wetwall vs Tile | Hatley Construction & Millwork
Client Login

Shower Panel Guide

Why Wetwall Panels Are Replacing Tile in Modern Bathrooms

Wetwall vs Tile

The honest comparison. Here is how shower panels stack up against traditional tile.

Category Wetwall Panels Traditional Tile
Installation 1 day 3–5 days
Maintenance No grout to clean Regular grout scrubbing & sealing
Cost Competitive with mid-range tile Varies widely by tile selection
Waterproofing 100% waterproof panels Depends on grout integrity
Design Large format, no grout lines Unlimited options, but grout lines
Durability Impact-resistant, no cracking Hard but can crack or chip
Usable After Install Same day 24–48 hours cure time
Tip: If you have ever spent a Saturday scrubbing grout lines, Wetwall is your answer. Zero grout means zero grout maintenance — for the life of the panels.

How Wetwall Works

Four steps from bare walls to a finished shower — in hours, not days.

1

Mount to Substrate

Panels mount directly to wall studs or existing substrate with adhesive. No backer board required.

2

Join Panels

Tongue-and-groove joints create watertight seams between panels. No grout, no caulk at seams.

3

No Cure Time

No tile spacers, no mortar, no grout to dry. The system is ready as soon as panels are set.

4

Use Same Day

Finished in hours, your shower is usable the same day. No waiting for anything to cure or set.

Panel Sizing Guide

Standard widths, cut to height on site. Here is how many panels typical showers need.

Standard Shower

3 panels

Two side walls + back wall. The most common configuration for a standard 36" or 48" shower stall.

Tub Surround

3–5 panels

Three walls around the tub. Wider tubs may need extra panels depending on wall lengths.

Walk-In Shower

3–6 panels

Larger walk-in designs with multiple wall sections. We will calculate exact panel count from your dimensions.

Tip: Send us your shower dimensions and we will tell you exactly how many panels you need. No guessing, no waste.

Choosing a Pattern

Three style families, dozens of options. Each creates a completely different feel.

Stone Looks

Marble, slate, and granite patterns. Classic elegance without the natural stone maintenance. Rich veining and depth.

Solid Colors

Clean whites, grays, and blacks. Modern minimal aesthetic that lets fixtures and accessories be the statement.

Wood Looks

Warm tones and natural grain patterns. Creates a spa-like feel in any bathroom. Waterproof, unlike real wood.

Tip: Our Clayton showroom has full-size Wetwall panels on display — seeing them in person is worth the trip. Photos do not do the texture justice.

Panel Edge Configurations

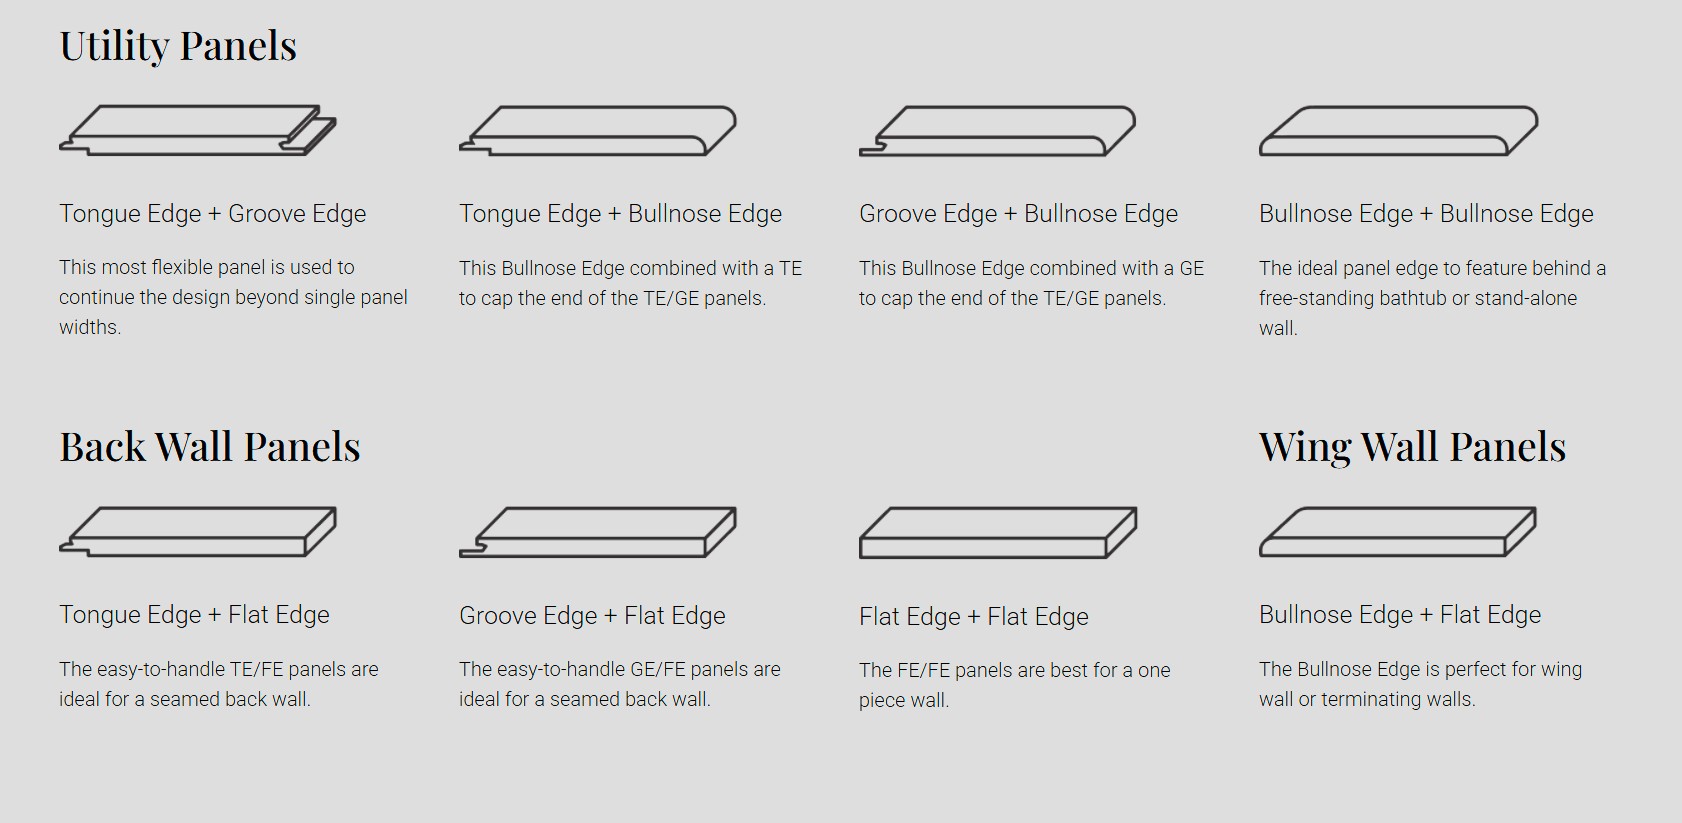
Every panel ships with specific edge profiles based on its position in your shower — utility panels join wall-to-wall, back wall panels sit against the rear, and wing walls terminate at the shower opening.

Wetwall panel edge configurations — Utility Panels, Back Wall Panels, and Wing Wall Panels with tongue, groove, bullnose, and flat edge options

DIY Installation Guide

Yes. Wetwall is designed for single-person installation. Here is what you need.

Tools Required

Tape measure
Pencil & chalk line
Level
Circular saw (fine-tooth blade)
Drill
Hole saw (for fixtures)
Caulking gun
Square
Suction cups (for handling)
Router (for cutouts)
Denatured alcohol
1/8" shims

Compatible Substrates

Wetwall panels mount directly to:

Can I install over existing tile? Yes. This is the #1 question we get. Wetwall panels mount directly over existing tile with adhesive — no demo required. The tile gives you a flat, stable substrate. Just make sure the tile is firmly bonded and clean.

What You’ll Need to Buy

Panels are only part of the picture. Here’s everything else you’ll need for a complete install.

Wetwall Panel Adhesive

Comes with your panels. This is what bonds the panels to the wall. One tube covers roughly one panel — check your kit to make sure you have enough.

Color-Matched Sealant

Also comes with your panels. Goes in every corner, every seam, and along the bottom edge. This is what keeps water out. Make sure the color matches your panel design.

Schluter Jolly Trim

Metal edge trim for exposed panel edges — gives a clean, finished look. Available in brushed nickel, chrome, and matte black. We sell this in our Install Supplies section.

Recessed Niche

Built-in shelf for shampoo and soap. Single or double-shelf options. Needs to be framed into the wall studs before you install panels. Browse Accessories.

Corner Shelf

Solid surface corner shelf that mounts through the panel into the stud wall. Clean look, no exposed brackets. Available in our Accessories section.

Denatured Alcohol

For cleaning up adhesive and sealant during install. Pick up a bottle at any hardware store — you’ll use it more than you think.

Not sure what you need? Send us your shower dimensions and we’ll put together a complete materials list — panels, sealant, trim, accessories, everything. Get a quote →

Read the Full Installation Guide →

Frequently Asked Questions

An innovative wall panel system for tub and shower walls, wainscoting, backsplashes, and tub skirts. Each panel has a decorative top layer, solid waterproof composite core, and durable backing layer.
Waterproof with no grout to maintain, mold and mildew resistant, installs in hours instead of days, goes directly over existing tile or drywall, and is usable the same day.
Experienced pros can complete a full tub or shower surround in about 2.5 hours. A DIY installer should plan for a half day. The shower is usable the same day.
Yes. Panels mount directly over existing tile, greenboard, drywall, cement board, plaster, and fiberboard using Wetwall panel adhesive. No demolition required.
Yes. The panels are lightweight — approximately 1.65 lbs per square foot. A standard 4-panel kit weighs about 105 lbs total. Suction cups make single-person handling practical.
Pencil, tape measure, drill, caulking gun, hole saw, level, circular saw with fine-tooth blade, square, chalk line, suction cups, router, denatured alcohol, and 1/8" shims.
Yes, but only in shower and tub applications. Not recommended for floors.
Yes. Panels can be cut for grab bars, soap dishes, and any wall-mounted fixture. Recessed niches and corner shelves are also available.
Wilsonart color-matched sealant with antimicrobial and AEON protection. Apply at all corners, seams between panels, and gaps at the bottom where panels meet the tub or shower pan.
Yes. Used in apartments, senior living, student housing, hotel guest rooms, and public restrooms. Fast install time and low maintenance make it ideal for multi-unit projects.
Widths: 8", 30", 32", 36", 48", and 60". Heights: 72" and 96". Panels are approximately 0.41" thick and weigh about 1.65 lbs per square foot.
Panels cut easily for window sills, niches, and any custom cutouts. A router or circular saw with a fine-tooth blade handles all cuts.

Ready to Ditch the Grout?

Schedule a consultation to see Wetwall panels in person, or browse our full pattern collection online.

Schedule a Consultation View Wetwall Patterns

Contractors and Designers: Apply for Trade Pricing

Verified trade professionals get Kitchen tier pricing (25% off MSRP) on any quantity, plus free shipping.

Apply for Trade Account →